Standard Part Library
How often do you take an existing part to change its values to create a derive part?


Do you know the standard part library can help you accomplish this task?
Preparation
Initially it is recommended to prepare your part by making sure you rename the variables to facilitate management.Also make sure that all the properties of your model are correctly enter.

Preparation work involve thinking about how would you like to sort the information. A tree type classification and a visual type with characteristics are available.


Standard Part Administrator
Once you have finish the preparation job, make a copy of the part in the “Standard Part” folder.The default directory is « C:\Solid Edge Standard Parts\Standard Parts ». If need, you can create subfolder to help management.
Once you have finish the preparation job, open the “Standard Part Administrator”.
From the start menu, select all programs…..

Standard Part Administrator –Add part
Once the administrator of the “Standard Part” is open, from the Database menu, select “Add parts”.

Several method are available to add on or more part(s) to the library. The one we are concern for this article ” Add from existing single part file”

The administrator ask to locate a part file. Select the part you have previously copy to the “Standard Part” directory.

Since the part contain no informations allowing its integration to the database, the administrator ask if you wish to execute the part editor.

Standard Part Administrator – Part editor
Properties
The editor ask to confirm that the properties enter in the preparation are entered correctly. If you desire to make modifications, select the corresponding cell inside the right column.

Standard Part Administrator – Part editor
Categories
The next step is to enter the necessary informations to sort your part in the database of the “Standard Part”.
The informations will be register in the “Category Info” tab.
At the preparation step, you thought about a classification tree method to sort the standard part. You will indicate the location in the tree, by using the browse button locate at the right end of the first line.

The editor propose you a folders tree structure. The tree structure is use for the non visual navigation inside the “Standard Part”.
To add a new category, right mouse button click on the background or on an existing category. You can also use the Insert key.


It is possible to define visual categories to ease the navigation.


Use the contextual menu or the buttons at the top right corner to add or edit the visual category.To create sub categories, double click on of the icons


Standard Part Administrator – Part editor
Part name
Write the “Part Name” to be used when the part will be generate by the database.

Standard Part Administrator – Part editor
Characteristics
The most important step, consist to define the characteristics of the category.
Parts who will be add later to that same category will need to have the same characteristics.
To add characteristics, use the drop down menu then add the values at the bottom of the window. Use the SHIFT + Insert to add multiple characteristic lines.


Start by giving a name to the characteristics.
- If the value is constant and the user does not need to enter any value when placing the part in the assembly, tick the check box constant. The constant value will be used to sort part in the category. The constant characteristics are identified with a beige background.
- If the value vary base on parameters and the value need to be enter by keying, made sure not to tick the check box. When placing the part in the assembly, you will be asked what value should have the characteristic. The non-constant characteristics are identified with a red background.
The value/variable column is used to keying the value of the characteristic.
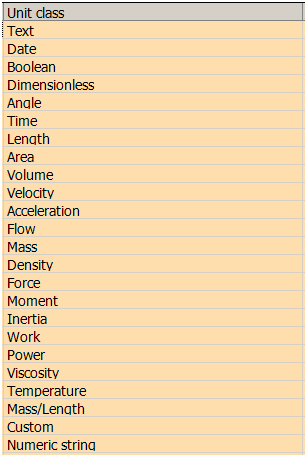
- For a constant value, you can keying alphanumeric value base on the unit class. « Unit class »
- For a non-constant value, you will have the possibility to enter a variable name. When placing the part in the assembly, you will be asked what value should have the variable. This value will be returned in the variable table of the part. This will allow to change part dimension.
The column “Unit class” heps define the type of data.
Standard Part Administrator – Part editor
Additional Tabs
The two tabs “Piping” and “Fastner” helps define the characteristics of plumbing components and fasteners.


You have finished adding your part into the database of the “standard Part”. The only thing left, open your assembly and use the “Standard Part” interface to insert you part.

Insert Part in the assembly
From within an assembly document select from the “Part Library” tab to access the “Standard Part” interface. Use the button “Place” at the bottom to add a copy of your part in your project.
Looking at the “Preview” section, there is three lines that are not a constant value ( red lines).

Once you click the “Place” button, the “Standard Part” will ask the value for those three lines.

To learn how to use a family of parts to add parts in batch click here
To learn how to use Excel to add parts in batch click here
For those who did not take a look at the Standard Part user guide.
No comments yet.
Solid DNA RSS

Solid Edge Virtual Training


Leave a comment